先抛出一个问题?
在go的context源码中,有这样一段话:
Do not store Contexts inside a struct type; instead, pass a Context
explicitly to each function that needs it. The Context should be the first
parameter, typically named ctx:func DoSomething(ctx context.Context, arg Arg) error { // ... use ctx ...}
为什么会有这同样的规定呢?看完这篇文章,你就会找到答案。
Context
不建议翻译为:上下文。毕竟语境和语义并不能十分契合
信雅达的翻译标准。
context.Context在Go语言中用来设置截止日期、同步信号,传递请求相关值的结构体。Context与 Goroutine 有比较密切的关系,是Go语言中独特的设计,在其他编程语言中我们很少见到类似的概念。 context.Context是Go语言在1.7版本中引入标准库的接口:
1 | // 去掉注释之后的结构 |
该接口定义了四个需要实现的方法,其中包括:
- Deadline — 返回 context.Context 被取消的时间,也就是完成工作的截止日期;
- Done — 返回一个 Channel,这个 Channel 会在当前工作完成或者context被取消后关闭,多次调用 Done 方法会返回同一个 Channel;
- Err — 返回 context.Context 结束的原因,它只会在 Done 方法对应的 Channel 关闭时返回非空的值;
- 如果 context.Context 被取消,会返回 Canceled 错误;
- 如果 context.Context 超时,会返回 DeadlineExceeded 错误;
- Value — 从 context.Context 中获取键对应的值,对于同一个context来说,多次调用 Value 并传入相同的 Key 会返回相同的结果,该方法可以用来传递请求特定的数据;
context 包中提供的 context.Background、context.TODO、context.WithDeadline 和 context.WithValue 函数会返回实现该接口的私有结构体,我们会在后面详细介绍它们的工作原理;
设计原理
在 Goroutine 构成的树形结构中对信号进行同步以减少计算资源的浪费是 context.Context 的最大作用。Go 服务的每一个请求都是通过单独的 Goroutine 处理的2,HTTP/RPC 请求的处理器会启动新的 Goroutine 访问数据库和其他服务。
如下图所示,我们可能会创建多个 Goroutine 来处理一次请求,而 context.Context 的作用是在不同 Goroutine 之间同步请求特定数据、取消信号以及处理请求的截止日期。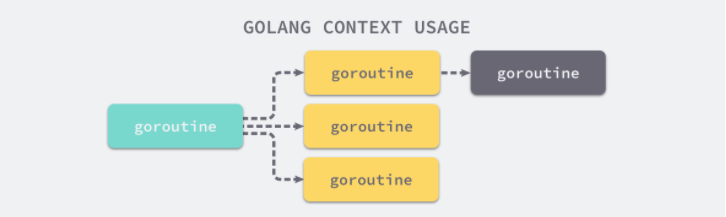
每一个 context.Context 都会从最顶层的 Goroutine 一层一层传递到最下层。context.Context 可以在上层 Goroutine 执行出现错误时,将信号及时同步给下层。
如上图所示,当最上层的 Goroutine 因为某些原因执行失败时,下层的 Goroutine 由于没有接收到这个信号所以会继续工作;但是当我们正确地使用 context.Context 时,就可以在下层及时停掉无用的工作以减少额外资源的消耗:
我们可以通过一个代码片段了解 context.Context 是如何对信号进行同步的。在这段代码中,我们创建了一个过期时间为 1s 的Context,并向context传入 handle 函数,该方法会使用 500ms 的时间处理传入的请求:
1 | func main() { |
因为过期时间大于处理时间,所以我们有足够的时间处理该请求,运行上述代码会打印出下面的内容:
1 | go run context.go |
handle 函数没有进入超时的 select 分支,但是 main 函数的 select 却会等待 context.Context 超时并打印出 main context deadline exceeded。
如果我们将处理请求时间增加至 1500ms,整个程序都会因为Context的过期而被中止,:
1 | go run context.go |
相信这两个例子能够帮助各位读者理解 context.Context 的使用方法和设计原理 — 多个 Goroutine 同时订阅 ctx.Done() 管道中的消息,一旦接收到取消信号就立刻停止当前正在执行的工作。
默认context的使用
context 包中最常用的方法还是 context.Background、context.TODO,这两个方法都会返回预先初始化好的私有变量 background 和 todo,它们会在同一个 Go 程序中被复用:
1 |
|
这两个私有变量都是通过 new(emptyCtx) 语句初始化的,它们是指向私有结构体 context.emptyCtx 的指针,这是最简单、最常用的context类型
1 | type emptyCtx int |
从上述代码中,我们不难发现 context.emptyCtx 通过空方法实现了 context.Context 接口中的所有方法,它没有任何功能。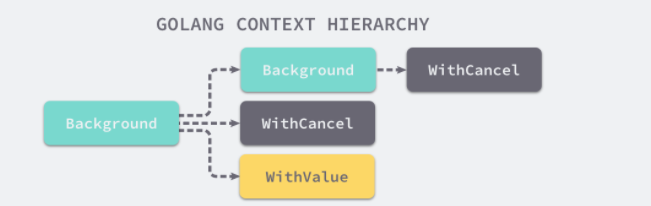
从源代码来看,context.Background 和 context.TODO 也只是互为别名,没有太大的差别,只是在使用和语义上稍有不同:
- context.Background 是context的默认值,所有其他的context都应该从它衍生出来;
- context.TODO 应该仅在不确定应该使用哪种context时使用;
在多数情况下,如果当前函数没有context作为入参,我们都会使用 context.Background 作为起始的context向下传递。
取消信号
context.WithCancel 函数能够从 context.Context 中衍生出一个新的子context并返回用于取消该context的函数。一旦我们执行返回的取消函数,当前context以及它的子context都会被取消,所有的 Goroutine 都会同步收到这一取消信号。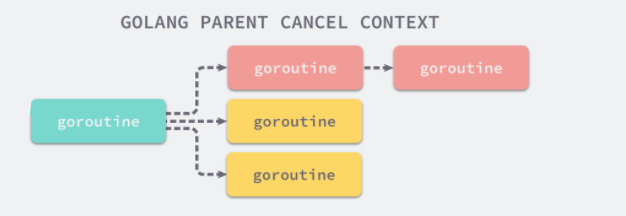
Context 子树的取消
我们直接从 context.WithCancel 函数的实现来看它到底做了什么:
1 | func WithCancel(parent Context) (ctx Context, cancel CancelFunc) { |
- context.newCancelCtx 将传入的context包装成私有结构体 context.cancelCtx;
- context.propagateCancel 会构建父子context之间的关联,当父context被取消时,子context也会被取消:
1 | func propagateCancel(parent Context, child canceler) { |
上述函数总共与父context相关的三种不同的情况:
- 当 parent.Done() == nil,也就是 parent 不会触发取消事件时,当前函数会直接返回;
- 当 child 的继承链包含可以取消的context时,会判断 parent 是否已经触发了取消信号;
- 如果已经被取消,child 会立刻被取消;
- 如果没有被取消,child 会被加入 parent 的 children 列表中,等待 parent 释放取消信号;
- 当父context是开发者自定义的类型、实现了 context.Context 接口并在 Done() 方法中返回了非空的管道时;
- 运行一个新的 Goroutine 同时监听 parent.Done() 和 child.Done() 两个 Channel;
- 在 parent.Done() 关闭时调用 child.cancel 取消子context;
context.propagateCancel 的作用是在 parent 和 child 之间同步取消和结束的信号,保证在 parent 被取消时,child 也会收到对应的信号,不会出现状态不一致的情况。
context.cancelCtx 实现的几个接口方法也没有太多值得分析的地方,该结构体最重要的方法是 context.cancelCtx.cancel,该方法会关闭context中的 Channel 并向所有的子context同步取消信号:
1 |
|
除了 context.WithCancel 之外,context 包中的另外两个函数 context.WithDeadline 和 context.WithTimeout 也都能创建可以被取消的计时器context context.timerCtx:
1 | func WithTimeout(parent Context, timeout time.Duration) (Context, CancelFunc) { |
context.WithDeadline 在创建 context.timerCtx 的过程中判断了父context的截止日期与当前日期,并通过 time.AfterFunc 创建定时器,当时间超过了截止日期后会调用 context.timerCtx.cancel 同步取消信号。
context.timerCtx 内部不仅通过嵌入 context.cancelCtx 结构体继承了相关的变量和方法,还通过持有的定时器 timer 和截止时间 deadline 实现了定时取消的功能:
1 | type timerCtx struct { |
值得注意的是,context.timerCtx.cancel 方法不仅调用了 context.cancelCtx.cancel,还会停止持有的定时器减少不必要的资源浪费。
传值方法
在最后我们需要了解如何使用context传值,context 包中的 context.WithValue 能从父context中创建一个子context,传值的子context使用 context.valueCtx 类型
1 | func WithValue(parent Context, key, val interface{}) Context { |
context.valueCtx 结构体会将除了 Value 之外的 Err、Deadline 等方法代理到父context中,它只会响应 context.valueCtx.Value 方法,该方法的实现也很简单:
1 | type valueCtx struct { |
如果 context.valueCtx 中存储的键值对与 context.valueCtx.Value 方法中传入的参数不匹配,就会从父context中查找该键对应的值直到某个父context中返回 nil 或者查找到对应的值。
小结
Go 语言中的 context.Context 的主要作用还是在多个 Goroutine 组成的树中同步取消信号以减少对资源的消耗和占用,虽然它也有传值的功能,但是这个功能我们还是很少用到。
在真正使用传值的功能时我们也应该非常谨慎,使用 context.Context 传递请求的所有参数一种非常差的设计,比较常见的使用场景是传递请求对应用户的认证令牌以及用于进行分布式追踪的请求 ID。
开头问题的解答
先对比下以下两种方式:
方式一:context-as-argument方式
1 | // Worker fetches and adds works to a remote work orchestration server. |
方式二: context-in-struct
1 | type Worker struct { |
结论:
- 方式一优点:
- 方法直接接受一个context。通过这种传递即参数的设计,用户可以设置每个调用的deadlines、cancellation和metadata。
- 传递给每个方法的context.Context将被如何使用是很清楚的:不存在传递给一个方法的context.Context会被其他方法使用的情况。
- context的传递范围几乎和它必须被使用的操作范围一致,这大大增加了这个包中context的效用和清晰度。
- 方式二缺点:
- 当你将context存储在一个struct中时,调用者无法控制该context的生命周期。
- 调用者无法为下游
Fetch()/Process设置deadlines、cancellation和metadata,无法对下游调用设置deadlines、cancellation控制。 - 调用者本身可能也存在context,这就会造成调用者的context和被调用者
Work结构体内的context混淆。
但是问题又来了:
1,聪明的你肯定发现了,方式二New可以传一个context给Worker,这样调用Worker的两个方法的时候,就可以避免上面说的方式二的缺点。
- 这种实现方式,需要配合相关的文档说明,来告诉调用者怎么使用Worker。
- 调用者无法根据Worker的方法名称和方法参数来了解方法的作用,必须以来文档。
- 无法做到方法一优点的第二点和第三点。
2,熟读go源码的你可能会发现,go标准库中存在方式二:context-in-struct的实现,比如下面的源码,这又是怎么回事呢?
1 | // A Request represents an HTTP request received by a server or to be sent by a client. |
原因:context是在Go 1.7才引入的方案,当时有大量的API需要引入context,考虑到向前兼容,所以采用了方式二。
3,如果我的原有代码需要引入context,怎么在向前兼容的前提下,进行迭代呢?
函数复用!实例如下:
1 | // Call uses context.Background internally; to specify the context, use |